Saturday, December 11, 2021

The Art of the Sympathetic Restoration, Part 1/d The Finished 1920's Ruby Road Bike


 Here we have the completed 1920's (maybe early thirties) Ruby road
bike, once again fully functioning and ready to ride.
You can see what it looked like before I started here
Even after the extensive research we (thanks Siobhan) have done, I
still cannot say for certain whether this machine was built by Ruby
in Dunedin, which operated up until the late 1920 
I think, or Ruby in Christchurch which operated up until the 1950's.
 

Advertisement for Ruby Special Cycles "The best and the prettiest"
Dunedin circa 1928


Advertisement for Ruby Cycle Works Christchurch circa; 1936
 
The gold high lights with red pin-stripping came up very nicely,
it is this colour combination which makes me think that this frame
could be from the Dunedin workshops.
It looks very 1920's to me, but would be happy to be proved wrong by
anyone who might be able to shed some light on this
....adrian@theflyingwheel.com
The gold on the seat stay caps was a nice touch I thought.
The original head transfer can just be made out, it seems to be
Boreas the Greek God of the North Wind, with the Earth in
behind. What is not so clear in the photo is
the script banner that contained the text which runs around
the sides and bottom of the image.
Must have been an impressive logo.
Williams crank set which seemed to have a single 'A' digit, 
this would have made it 1912/13 series crank set, which I
am very dubious about, it was a bit unclear so unfortunately
couldn't really be used to help date the bike, which is a a haphazard 
way to date bike at the best of times to start with IMO.
More on Williams crank dating here and here
 
Phillips saddle actually softened up remarkably well over a 
month or two, and is also really comfortable, well at least
it was was over the 40 km test ride I have ridden it so far.

Classic Major Taylor cockpit, to be honest I am always very
tempted to place the bars under the outrigger, but have to say that
it makes for an extremely comfortable ride mounted as they are.
I guess there is good reason why most road men had them 
mounted this way.
Very pleased with the wheelset, the brass nipples are a nice little
touch, after getting down and dirty with a wire wheel on drill, I then 
rust neutralized both sides of the rims. The spokes where rubbed
down with medium wire wool, the final touch was rubbing in some
black stove polish which took to the old porous galvanized very well.


Even the hubs came up well, the thick layers of grease and dirt
had protected them well over many decades.


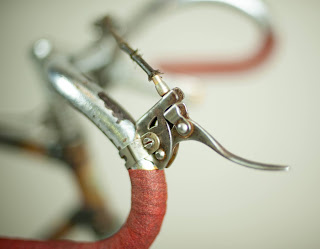
Those brakes!..here are the Australian made "GEM" brakes.
They work about as poorly as you would expect, though that being
said,most race bikes in New Zealand during this period didn't even 
have brakes, and were fixed wheel, the term 'better than nothing'
kept springing to mind when I test rode the bike.


The brake lever looks like it could be extremely lethal in the wrong
accident..note to self..don't crash!
The RUBY down tube decal with Flying Wheels on each end...nice.

So there you have it, a complete ground up restoration of an (about)
hundred year old New Zealand build road racing bicycle, 
ten years ago I would have probably have remade the decals,
stripped and repainted the bike.
That being said, I wouldn't get upset if someone out there decided
that is what they would prefer to do..each to their own I say.

Overall I am really pleased with the result, although very aged,
the patina is very nice, and the bike looks quite impressive, and
certainly feels impressive to ride.

I will post up a road test shortly, yes it was fun!


The Art of the Sympathetic Restoration, Part 1/c The Components and Wheel Set and those Brakes!


Up next was the job of slowing going through the components, cleaning and degreasing, dealing with rust where needed and the polishing, waxing and reassembling.
 
Strangely I had so far somehow missed what turned out to be the most interesting item on the bike, the rear "GEM" brake set, which after a bit of internet detective work, turns out to be of Australian origin, and judging by the lack of internet information and presence, I would say quite a rare item.

Here are the "GEM" brakes, which are clamped onto the rear seat stays, the brake arms themselves act as the brake spring...not that successfully as it turns out!

the wheel set as always, turned out to be one of the most time consuming parts of the entire project, as you can see they were in pretty poor condition, though luckily none of the rust had actually gone through the rims.


I had to cut the perished tyres off the rimes..first time I have had to do this.


The bottom bracket had obviously not seen a mechanics tool for quite a while...
 
 Here is the B/B shell after following the steps outlined in the previous post


Monday, November 22, 2021

The Art of the Sympathetic Restoration, Part 1/a The Frame Set.

Here is a simple run down of how I go about cleaning, rust removing and preserving the surviving paint work and decals on a rough pre war bike frame set, now keep in mind this is just the way I do it, and it works for me, many others will have different methods which could well be better than mine, but I am pretty happy with the results I get. 

The forks in their 'natural' aged state, after a soapy clean.


First up I clean the fame with soapy water, which is a bit of a waste of time really, except it does one great thing...when it is wet, it gives you a brief but inspiring approximate idea of what the frame might look like when finished, then when it quickly dries and looks like crap again, you are left with the task of just rolling up your sleeves and getting that same look to stay permanent, mainly through some pretty dirty, sometimes tedious but ultimately extremely rewarding work.

I then degrease the frame with spray on degreaser, getting into the corners with old stiff toothbrushes, I also find an old small but blunted screwdriver with your rag covering the tip comes in handy during this operation around the lugs etc, obviously being very careful not to damage the paint finish.


A bit of acid action...
 
After the frame is thoroughly cleaned, I then use a phosphoric acid cleaner on the exposed rust, getting into the surface rust with 000 wire wool at the same time...wear rubber gloves of course. If the rust is quite heavy and scaly, I might use a coarser wire wool, but am always being very careful to not further damage remaining paint or bright work.

Once I am happy with the 'finish' on the areas of surface rust, I apply a rust neutralizer only to those area's with a small brush. Many of these products will leave a semi-gloss black finish, which is not a bad thing in some cases, but not always. 

Depending on the area of rust and the finish I am looking for, I sometimes clean off the neutralizer before it has completely hardened off, as some fully hardened neutralizers do have quite a particular 'look' to them, and by removing it before it has fully hardened it looks (ironically enough) a little more neutral.

Rust neutralizer carefully applied to treated surface rust areas only.
 
After neutralizing the rusted areas I then cut the entire frame using an automotive cutting paste..now it is extremely important to take care during this stage as one over zealous rubbing motion could remove a bit of pin stripe or bit of decal colour..maybe start out using something less aggressive just to be safe.
 
Cutting paste sparingly and carefully used

Next up is the pay off, the polishing stage...I use Brazilian Carnauba car wax, and lots of it.

Forks up on the stand being polished and buffed at least two or three times.
 

  The forks finished and looking pretty nice.
 
So there you have it, well as far as restoring the frame/forks go anyway, doing the components is another process which I will go into next, then you will see the complete finished bike, which came up not to bad if  may say so myself.


Wednesday, November 17, 2021

The Art of the Sympathetic Restoration, Part 1 The Ruby

Firstly let me just say that the following posts on"The Art of the Sympathetic Restoration" are only my personal thoughts on, and a signal in the direction I will be taking going forward within the world of Vintage/Classic racing bicycle collecting, buying, selling and restoration etc...of course many others will have a completely different approach, and that is a good thing, different strokes for different folks I always say.

Over the past several years it has been been becoming more and more obvious to me that my approach to tbicycle restoration has been quite a bit too hard edged...I guess if I am honest about it, my first thoughts upon receiving an old racing bike, that has no known history or provenance, has been 'strip it and repaint it' it, and if no decals of suitable quality are available (which is about half the time) recreate my own.

I am realizing now that actually each bike really needs to be far more carefully thought about and assessed before taking that radical and irreversible step of stripping it down to bare metal.

Some questions that I am asking myself now (and have been for a while) are...is it in original paint? how much of that originality is left, how much can  can be saved if needed?, how rare is this particular bike in it's current condition? etc etc. Now don't get me wrong, I absolutely love restoring racing bikes, I really enjoy the challenge of recreating a vintage racing bike for myself and customers that should look and ride/feel almost exactly like it would have done when new...but going forward I am removing the knee jerk reaction of doing that to most bikes that cross my path.

So as my first example for  "The Art of the Sympathetic Restoration" I am undertaking what I consider to be an easy choice for this undertaking...a pretty original 1920's NZ built race bike.

A few months ago I happened upon this rather neglected looking bike on a local sales site, it was located down at the other end of the country (of course!), but I was keen on the Major Taylor cockpit and especially on the narrow racing/sports 28" spear point mudguards, the bike had obviously been pressed into service as a commuter at the end of it's racing career.

When my friend,  Jason  (Bidrider Motorcycle Delivery Company, I highly recommend his service if you are in NZ) who picks up my South Island bikes for me, delivered it...still dragging some weeds wound through it's spokes, he was slightly amused at my purchase...though this is far from the first rusty heap he has dragged into my shop!

It was instantly clear that hiding under a heavy patina was the original paint, I had half suspected this from the very unclear photos in the original ad, but was pleasantly surprised non the less.

But what was really exciting was that the original decal "Ruby" with a flying wheel on each end, could just be made out on the down tube.

If you have had anything to do with pre-war New Zealand racing bikes you will know that at least 70% + of them have been repainted at some point, and almost never with the original decals or anything to give you a clue as to it's origins. Now I know that some collectors out there claim to be able to identify some makers, I am personally a little more circumspect about identifying pre war frames.  


Having the name still on the bike instantly gave this bike a provenance that meant I could justify to myself the many many hours of work that would be needed to restore this machine.

A little gold with red stripping peeping through just below the seat cluster...

The Major Taylor stem and classic 20's-30's bars that first caught my eye...love that imposing Miller headlight on the the end of the outrigger, I will restore the lights and guards at some later point and refit them to the bike, but for this project I am returning the bike back into into it's original racing trim.

I was pleased to find the narrow racing rims, even though covered in a thick coat of surface rust, were free of actual rust holes, the brass spoke nipples, now oxidized green should come up nicely with a time of work/time, the galvanized spokes seems to be hanging in there as well.
Overall the bike looked to be in pretty original order, right down to the twin fixed wheel drive train, and had clearly been left untouched for decades...and lots of them!
Phillips saddle at first looked pretty knackered, but like the rest of the bike, responded well to a bit of careful TLC.


Friday, February 19, 2021

Mitchell Madness part 2

Here are another two Mitchell's I built up along
side the Mitchell featured here.
These two bikes are for sale here, as I keep on telling
myself  'you can't keep them all', no seriously these
two were always meant to be for sale, believe me I
have more than enough Mitchell's for myself.
Though that being, said I am still always looking
for frames with known race history (any size)
or Mitchell's built with Columbus or
Reynolds in 56/57cm..let me know.
 

The first is a nice Mitchell Professional track bike
(frame No 396), which of course has undergone a
full ground up restoration.

This blue must have been pretty popular,
I am sure that at least half of the Mitchell's I
have ever seen are this blue, which is not a
bad thing, it looks rather striking.


Zeus Pista crank set with Zeus 48t ring
Zeus Pista bottom bracket set
Nice Kyokuto Pro Race pedals

I haven't been able to find any period photos of
Mitchell track bikes in action, if anyone out there
has one or two, please let me know.


Tight, but not to tight.
Zeus Gran sport head set.
You can clearly make out the clear
vinyl wrap of the 'professional' decal


3ttt Record Stem with Ambrosio -Champion- bars


View from the cockpit with Cinelli saddle.

Classic Mitchell/Ishiwata lug detail

Zeus Criterium seat post


Maillard track hubs laced to Fiamme 32/40 rims
World champ colours painted into the flange slots

Mitchell frame sets were sold through many cycle shops
around the country, Laurie Coats Speedwell Cycles
in Auckland being one.


A damn fine looking machine from any angle.

Next is a quite rare Mitchell Professional road bike
built with Columbus SL which is actually what I am
after for myself, ( I already have a couple of Ishiwata bikes)
but this one is just a touch to small for me...damn.

I built it up with a mix of first generation and second 7100
(or DA-100) it get confusing!) Dura Ace components,
I have done a couple of hundred km's on it, and have got to
say, this Dura Ace gear is very easy to get used too.


The very pretty, very light and smooth operating
Dura Ace 7100 rear derailleur, which had by all
    accounts taken the best from Campagnolo and
Suntour and rolled them into this..


The whole drive train works very nicely, is very
easy to set up and looks great too.


The classic 3ttt Bar/Stem combination.

You will have to excuse the brake hoods, I had a couple of
NOS Shimano sets coming in from Europe,
but they never made here, which seems to be a bit of a
thing with these current Covid disruptions.

Benotto bar wrap..my favorite, except when I get
the motivation and it is the right bike to stich on some
leather wrap, which is unbeatable.


The new Mitchell 'Gerber' decals looking the part
as does a Columbus SL decal on a Mitchell frame.
Now I just need to find one in 56/57cm...
Frame number 745, these frame numbers are quite small
and always seen to be stamped at the centre/rear of the
bottom bracket shell.

Just one more view of that drive train, the more I
use it the more I like it.

As I mentioned these two are for sale, I don't usually like
to put bikes for sale on this blog, but I did want to display
a couple more Mitchell's from the project, so you will have
to forgive me for my crass commercialism.